Learning WebRTC: Local Setup with React frontend and a signaling server
Last year, I was captivated by how apps like Zoom, Google Meet, and even Discord deliver seamless real-time communication over the internet. As someone who loves to tinker, I decided to build my own video calling app to understand the magic behind it. That’s when I discovered WebRTC, a powerful technology that makes peer-to-peer audio, video, and data sharing possible right in the browser. After some trial and error (and a bit of procrastination), I’m excited to share a beginner-friendly guide to building a simple video calling app using WebRTC, React, and a Node.js signaling server with Socket.IO. Let’s dive in!
What is WebRTC?
WebRTC (Web Real-Time Communication) is an open-source project that enables real-time communication directly in web browsers and mobile apps without plugins. It’s the backbone of many modern applications, from video conferencing (Zoom, Google Meet) to live streaming (Twitch) and even peer-to-peer file sharing or gaming.
WebRTC consists of two key components:
- Protocols: A set of standards that ensure secure, low-latency communication:
- RTP (Real-time Transport Protocol): Streams audio and video between peers.
- ICE (Interactive Connectivity Establishment): Finds the best network path for peers, even behind firewalls or NATs.
- SDP (Session Description Protocol): Describes the media (e.g., video resolution, codecs) each peer can send or receive.
- API: A collection of JavaScript APIs built into modern browsers (Chrome, Firefox, Safari) that let developers access WebRTC functionality. While primarily used in JavaScript, WebRTC also supports native implementations (e.g.,
libwebrtcfor C++ or mobile apps).
With WebRTC, you can build rich, interactive apps without relying on third-party servers for media streaming, as peers communicate directly once connected.
What Are We Going to Do?
In this tutorial, we’ll create a simple React app where two users can join a room and start a video call. To make this work, we need a signaling server to help peers find each other and exchange connection details (like network addresses and media settings). We’ll build this server using Node.js and Socket.IO, then connect it to a React frontend that handles video streams and WebRTC connections. By the end, you’ll have a working video call app for two peers in a single room, complete with audio and video.
Note: This app is a minimal example and supports only two peers. For production, you’d want to add features like TURN servers for better connectivity or support for multiple peers.
Setting Up the Signaling Server
The signaling server is the backbone of our WebRTC app. It acts as a middleman, helping peers exchange metadata (like SDP offers/answers and ICE candidates) to establish a direct peer-to-peer connection. Once the connection is set up, the peers communicate directly, and the server’s job is mostly done.
Prerequisites
- Install Node.js (v16 or later recommended). Check with
node -vandnpm -v. - Basic familiarity with JavaScript, Node.js, and npm is helpful but not required.
- A code editor (e.g., VS Code) and a terminal.
Step 1: Initialize the Project
Create a directory for the signaling server, set up a Node.js project, and install dependencies:
1mkdir webrtc-signaling
2cd webrtc-signaling
3npm init -y
4npm install socket.io express
Edit package.json to enable ES modules by adding:
1{
2  "type": "module"
3}
Step 2: Create the Express Server with Socket.IO
Create a file named server.js with the following code to set up an Express server integrated with Socket.IO for real-time communication:
 1import express from "express";
 2import { createServer } from "node:http";
 3import { Server } from "socket.io";
 4
 5const app = express();
 6const httpServer = createServer(app);
 7const io = new Server(httpServer, {
 8  cors: {
 9    origin: "*", // Allow connections from any origin (restrict in production)
10    methods: ["GET", "POST"],
11  },
12});
13
14// Socket.IO event handlers will go here
15
16httpServer.listen(5000, "0.0.0.0", () => {
17  console.log("Signaling server running on port 5000");
18});
This code:
- Sets up an Express server to handle HTTP requests.
- Creates an HTTP server with Node’s
httpmodule. - Initializes Socket.IO for WebSocket communication, allowing real-time message exchange.
- Configures CORS to allow connections from the React frontend (update
originfor production security).
Step 3: Implement Socket.IO Events
The signaling server needs to handle key WebRTC events to coordinate peer connections. Add the following event handlers inside server.js:
 1io.on("connection", (socket) => {
 2  console.log(`New client connected: ${socket.id}`);
 3
 4  // Join a room to group peers
 5  socket.on("join", (room) => {
 6    socket.join(room);
 7    console.log(`Client ${socket.id} joined room ${room}`);
 8  });
 9
10  // Relay SDP offer to peers in the room
11  socket.on("offer", (data) => {
12    socket.to(data.room).emit("offer", data.sdp);
13  });
14
15  // Relay SDP answer to peers in the room
16  socket.on("answer", (data) => {
17    socket.to(data.room).emit("answer", data.sdp);
18  });
19
20  // Relay ICE candidates between peers
21  socket.on("ice-candidate", (data) => {
22    socket.to(data.room).emit("ice-candidate", data.candidate);
23  });
24
25  // Log when a client disconnects
26  socket.on("disconnect", () => {
27    console.log(`Client disconnected: ${socket.id}`);
28  });
29});
What’s Happening?
- Connection: Logs when a client connects and assigns a unique
socket.id. - Join: Adds the client to a room (identified by a room ID) using Socket.IO’s
joinmethod, grouping peers for communication. - Offer: When a peer initiates a call, it sends an SDP offer (describing its media capabilities). The server forwards this to other peers in the room.
- Answer: The receiving peer responds with an SDP answer, which the server relays back to the initiator.
- ICE Candidate: Peers exchange ICE candidates (network routing details) via the server to find the best path for direct communication.
- Disconnect: Logs when a client leaves, helping you track active peers (in production, you might notify other peers or clean up rooms).
Run the server with:
1node server.js
You should see “Signaling server running on port 5000” in the terminal.
Setting Up the React Frontend
Now, let’s build the React frontend to capture video/audio, establish WebRTC connections, and display streams. We’ll use Vite for a fast setup and socket.io-client to connect to our signaling server.
Step 1: Create the React Project
Set up a new React app with Vite:
1npm create vite@latest webrtc-frontend -- --template react
2cd webrtc-frontend
3npm install
4npm install socket.io-client
Start the development server:
1npm run dev
This typically runs on http://localhost:5173. Open this URL in your browser to see the default Vite app.
Clear the contents of src/App.jsx to start fresh:
1function App() {
2  return <div></div>;
3}
4
5export default App;
Step 2: Set Up State and Refs
Replace App.jsx with the following code to initialize state and refs for managing the WebRTC connection and UI:
 1import { useEffect, useRef, useState } from "react";
 2import { io } from "socket.io-client";
 3
 4function App() {
 5  const socketRef = useRef(null); // Socket.IO connection
 6  const localStreamRef = useRef(null); // Local video element
 7  const remoteStreamRef = useRef(null); // Remote video element
 8  const peerConnRef = useRef(null); // WebRTC peer connection
 9
10  const [inputVal, setInputVal] = useState(""); // Room ID input
11  const [room, setRoom] = useState(""); // Current room ID
12
13  // Other code will go here
14
15  return <div></div>;
16}
17
18export default App;
What’s Happening?
- Refs:
useRefcreates persistent references for:socketRef: The Socket.IO client connection.localStreamRef: The<video>element for the user’s camera feed.remoteStreamRef: The<video>element for the remote peer’s feed.peerConnRef: The WebRTCRTCPeerConnectionobject.
- State:
inputValstores the user’s room ID input, androomtracks the active room after joining.
Step 3: Initialize Socket and WebRTC
Use a useEffect hook to set up the Socket.IO connection and WebRTC peer connection when the user joins a room:
 1useEffect(() => {
 2  // Connect to the signaling server
 3  const socket = io("http://localhost:5000", {
 4    transports: ["websocket"],
 5  });
 6  socketRef.current = socket;
 7
 8  async function startVideoStreams() {
 9    // Join the room on connection
10    socket.on("connect", () => {
11      console.log(`Connected as: ${socket.id}`);
12      socket.emit("join", room);
13    });
14
15    // Initialize WebRTC peer connection with a STUN server
16    peerConnRef.current = new RTCPeerConnection({
17      iceServers: [{ urls: "stun:stun.l.google.com:19302" }],
18    });
19
20    // Send ICE candidates to the other peer via the signaling server
21    peerConnRef.current.onicecandidate = (event) => {
22      if (event.candidate) {
23        socket.emit("ice-candidate", { room, candidate: event.candidate });
24      }
25    };
26
27    // Display the remote stream when received
28    peerConnRef.current.ontrack = (event) => {
29      if (remoteStreamRef.current) {
30        remoteStreamRef.current.srcObject = event.streams[0];
31        console.log("Received remote stream");
32      }
33    };
34
35    // Handle incoming SDP offer
36    socket.on("offer", async (sdp) => {
37      if (!peerConnRef.current) return;
38      await peerConnRef.current.setRemoteDescription(new RTCSessionDescription(sdp));
39      const answer = await peerConnRef.current.createAnswer();
40      await peerConnRef.current.setLocalDescription(answer);
41      socket.emit("answer", { room, sdp: answer });
42    });
43
44    // Handle incoming SDP answer
45    socket.on("answer", async (sdp) => {
46      if (!peerConnRef.current) return;
47      await peerConnRef.current.setRemoteDescription(new RTCSessionDescription(sdp));
48    });
49
50    // Handle incoming ICE candidates
51    socket.on("ice-candidate", async (candidate) => {
52      try {
53        if (candidate) {
54          await peerConnRef.current.addIceCandidate(new RTCIceCandidate(candidate));
55        }
56      } catch (error) {
57        console.error("Failed to add ICE candidate:", error);
58      }
59    });
60  }
61
62  // Start setup only if a room is specified
63  if (room !== "") startVideoStreams();
64
65  // Cleanup on unmount or room change
66  return () => {
67    socket.disconnect();
68    peerConnRef.current?.close();
69  };
70}, [room]);
What’s Happening?
- Socket Connection: Connects to the signaling server at
http://localhost:5000using WebSocket transport for real-time communication. - Join Room: On connection, emits a
joinevent to join the specified room, grouping peers for signaling. - Peer Connection: Creates an
RTCPeerConnectionwith a Google STUN server to help peers discover network paths across NATs/firewalls. - ICE Candidates: Sends ICE candidates (network routing info) to the signaling server when generated.
- Remote Stream: Assigns the remote peer’s stream to the
remoteStreamRefvideo element when received via theontrackevent. - Signaling Events:
- Offer: Sets the incoming SDP offer as the remote description, creates an answer, and sends it back via the server.
- Answer: Sets the incoming SDP answer as the remote description to complete the handshake.
- ICE Candidate: Adds incoming ICE candidates to the peer connection to establish the best network path.
- Cleanup: Disconnects the socket and closes the peer connection when the component unmounts or the room changes, preventing resource leaks.
Step 4: Start Camera and Initiate Call
Add a function to capture the user’s camera and microphone and start the WebRTC connection:
 1const startCamera = async () => {
 2  if (!peerConnRef.current) {
 3    console.error("PeerConnection not ready yet");
 4    return;
 5  }
 6
 7  try {
 8    // Request camera and microphone access
 9    const localStream = await navigator.mediaDevices.getUserMedia({
10      video: true,
11      audio: true,
12    });
13
14    // Display local stream in the video element
15    if (localStreamRef.current) {
16      localStreamRef.current.srcObject = localStream;
17    }
18
19    // Add local tracks to the peer connection
20    localStream.getTracks().forEach((track) => {
21      peerConnRef.current.addTrack(track, localStream);
22    });
23
24    // Create and send SDP offer
25    const offer = await peerConnRef.current.createOffer();
26    await peerConnRef.current.setLocalDescription(offer);
27    socketRef.current.emit("offer", { room, sdp: offer });
28  } catch (error) {
29    console.error("Failed to start camera:", error);
30  }
31};
What’s Happening?
- Checks if the peer connection is ready to avoid errors.
- Requests camera and microphone access, prompting the user for permission.
- Assigns the local stream to the
localStreamRefvideo element for preview. - Adds video and audio tracks to the
RTCPeerConnectionto share with the remote peer. - Creates an SDP offer, sets it as the local description, and sends it to the signaling server to initiate the call.
Step 5: Build the User Interface
Add the JSX to create a simple UI with an input for the room ID, buttons to join the room and start the call, and video elements for local and remote streams:
 1const videoStyle = {
 2  height: "200px",
 3  aspectRatio: "video",
 4};
 5
 6const handleJoinRoom = () => {
 7  setRoom(inputVal);
 8  console.log(`Joining room: ${inputVal}`);
 9};
10
11return (
12  <div style={{ padding: "20px", textAlign: "center" }}>
13    <h2>WebRTC Video Call</h2>
14    <div style={{ marginBottom: "20px" }}>
15      <input
16        type="text"
17        value={inputVal}
18        onChange={(e) => setInputVal(e.target.value)}
19        placeholder="Enter room ID"
20        style={{ padding: "8px", marginRight: "10px" }}
21      />
22      <button onClick={handleJoinRoom} style={{ padding: "8px 16px" }}>
23        Join Room
24      </button>
25      <button onClick={startCamera} style={{ padding: "8px 16px", marginLeft: "10px" }}>
26        Start Camera and Mic
27      </button>
28    </div>
29    <div
30      style={{
31        display: "flex",
32        gap: "1rem",
33        justifyContent: "center",
34        alignItems: "center",
35      }}
36    >
37      <video
38        ref={localStreamRef}
39        autoPlay
40        playsInline
41        controls={false}
42        style={videoStyle}
43        muted
44      />
45      <video
46        ref={remoteStreamRef}
47        autoPlay
48        playsInline
49        controls={false}
50        style={videoStyle}
51      />
52    </div>
53  </div>
54);
What’s Happening?
- Input and Buttons: The input field captures the room ID, and buttons trigger
handleJoinRoom(sets theroomstate) andstartCamera(starts the call). - Video Elements: Two
<video>elements display the local and remote streams. TheautoPlayandplaysInlineattributes ensure videos play automatically (including on mobile). Themutedattribute on the local video prevents audio feedback. - Styling: Basic inline styles center the UI, set video sizes, and add spacing for a clean look.
Step 6: Complete the App
Combine all the code into src/App.jsx:
  1import { useEffect, useRef, useState } from "react";
  2import { io } from "socket.io-client";
  3
  4function App() {
  5  const socketRef = useRef(null);
  6  const localStreamRef = useRef(null);
  7  const remoteStreamRef = useRef(null);
  8  const peerConnRef = useRef(null);
  9
 10  const [inputVal, setInputVal] = useState("");
 11  const [room, setRoom] = useState("");
 12
 13  useEffect(() => {
 14    const socket = io("http://localhost:5000", {
 15      transports: ["websocket"],
 16    });
 17    socketRef.current = socket;
 18
 19    async function startVideoStreams() {
 20      socket.on("connect", () => {
 21        console.log(`Connected as: ${socket.id}`);
 22        socket.emit("join", room);
 23      });
 24
 25      peerConnRef.current = new RTCPeerConnection({
 26        iceServers: [{ urls: "stun:stun.l.google.com:19302" }],
 27      });
 28
 29      peerConnRef.current.onicecandidate = (event) => {
 30        if (event.candidate) {
 31          socket.emit("ice-candidate", { room, candidate: event.candidate });
 32        }
 33      };
 34
 35      peerConnRef.current.ontrack = (event) => {
 36        if (remoteStreamRef.current) {
 37          remoteStreamRef.current.srcObject = event.streams[0];
 38          console.log("Received remote stream");
 39        }
 40      };
 41
 42      socket.on("offer", async (sdp) => {
 43        if (!peerConnRef.current) return;
 44        await peerConnRef.current.setRemoteDescription(new RTCSessionDescription(sdp));
 45        const answer = await peerConnRef.current.createAnswer();
 46        await peerConnRef.current.setLocalDescription(answer);
 47        socket.emit("answer", { room, sdp: answer });
 48      });
 49
 50      socket.on("answer", async (sdp) => {
 51        if (!peerConnRef.current) return;
 52        await peerConnRef.current.setRemoteDescription(new RTCSessionDescription(sdp));
 53      });
 54
 55      socket.on("ice-candidate", async (candidate) => {
 56        try {
 57          if (candidate) {
 58            await peerConnRef.current.addIceCandidate(new RTCIceCandidate(candidate));
 59          }
 60        } catch (error) {
 61          console.error("Failed to add ICE candidate:", error);
 62        }
 63      });
 64    }
 65
 66    if (room !== "") startVideoStreams();
 67
 68    return () => {
 69      socket.disconnect();
 70      peerConnRef.current?.close();
 71    };
 72  }, [room]);
 73
 74  const startCamera = async () => {
 75    if (!peerConnRef.current) {
 76      console.error("PeerConnection not ready yet");
 77      return;
 78    }
 79
 80    try {
 81      const localStream = await navigator.mediaDevices.getUserMedia({
 82        video: true,
 83        audio: true,
 84      });
 85
 86      if (localStreamRef.current) {
 87        localStreamRef.current.srcObject = localStream;
 88      }
 89
 90      localStream.getTracks().forEach((track) => {
 91        peerConnRef.current.addTrack(track, localStream);
 92      });
 93
 94      const offer = await peerConnRef.current.createOffer();
 95      await peerConnRef.current.setLocalDescription(offer);
 96      socketRef.current.emit("offer", { room, sdp: offer });
 97    } catch (error) {
 98      console.error("Failed to start camera:", error);
 99    }
100  };
101
102  const handleJoinRoom = () => {
103    setRoom(inputVal);
104    console.log(`Joining room: ${inputVal}`);
105  };
106
107  const videoStyle = {
108    height: "200px",
109    aspectRatio: "video",
110  };
111
112  return (
113    <div style={{ padding: "20px", textAlign: "center" }}>
114      <h2>WebRTC Video Call</h2>
115      <div style={{ marginBottom: "20px" }}>
116        <input
117          type="text"
118          value={inputVal}
119          onChange={(e) => setInputVal(e.target.value)}
120          placeholder="Enter room ID"
121          style={{ padding: "8px", marginRight: "10px" }}
122        />
123        <button onClick={handleJoinRoom} style={{ padding: "8px 16px" }}>
124          Join Room
125        </button>
126        <button onClick={startCamera} style={{ padding: "8px 16px", marginLeft: "10px" }}>
127          Start Camera and Mic
128        </button>
129      </div>
130      <div
131        style={{
132          display: "flex",
133          gap: "1rem",
134          justifyContent: "center",
135          alignItems: "center",
136        }}
137      >
138        <video
139          ref={localStreamRef}
140          autoPlay
141          playsInline
142          controls={false}
143          style={videoStyle}
144          muted
145        />
146        <video
147          ref={remoteStreamRef}
148          autoPlay
149          playsInline
150          controls={false}
151          style={videoStyle}
152        />
153      </div>
154    </div>
155  );
156}
157
158export default App;
Step 7: How It Works
Here’s the flow of the video call process:
- Join Room: Both peers enter the same room ID and click “Join Room,” connecting to the signaling server and initializing an
RTCPeerConnection. - Start Camera: The first peer clicks “Start Camera and Mic,” capturing their video/audio, adding tracks to the peer connection, and sending an SDP offer to the server.
- Exchange Offer/Answer: The server relays the offer to the second peer, who responds with an SDP answer. Both peers set these descriptions to negotiate media capabilities.
- Exchange ICE Candidates: Peers exchange ICE candidates via the server to find the best network path for direct communication.
- Display Streams: Once connected, the remote peer’s stream appears in the
remoteStreamRefvideo element, and the call begins.
Step 8: Test the Application
To see your app in action:
Run the Signaling Server:
1cd webrtc-signaling
2node server.js
Confirm it’s running on
http://localhost:5000.Run the React App:
1cd webrtc-frontend
2npm run dev
Open
http://localhost:5173in two browser tabs (e.g., Chrome).Test the Call:
- In both tabs, enter the same room ID (e.g.,
room1) and click “Join Room.” - In one tab, click “Start Camera and Mic” to initiate the call. Grant camera/microphone permissions.
- In the other tab, click “Start Camera and Mic” to accept the call.
- You should see your local video in one video element and the remote peer’s video in the other.
- In both tabs, enter the same room ID (e.g.,
Troubleshooting:
- Check the browser console for errors (e.g.,
Failed to add ICE candidate). - Ensure both peers use the same room ID.
- Verify the STUN server is accessible and the signaling server is running.
- If the remote video doesn’t appear, ensure firewall settings allow WebRTC traffic.
- Check the browser console for errors (e.g.,
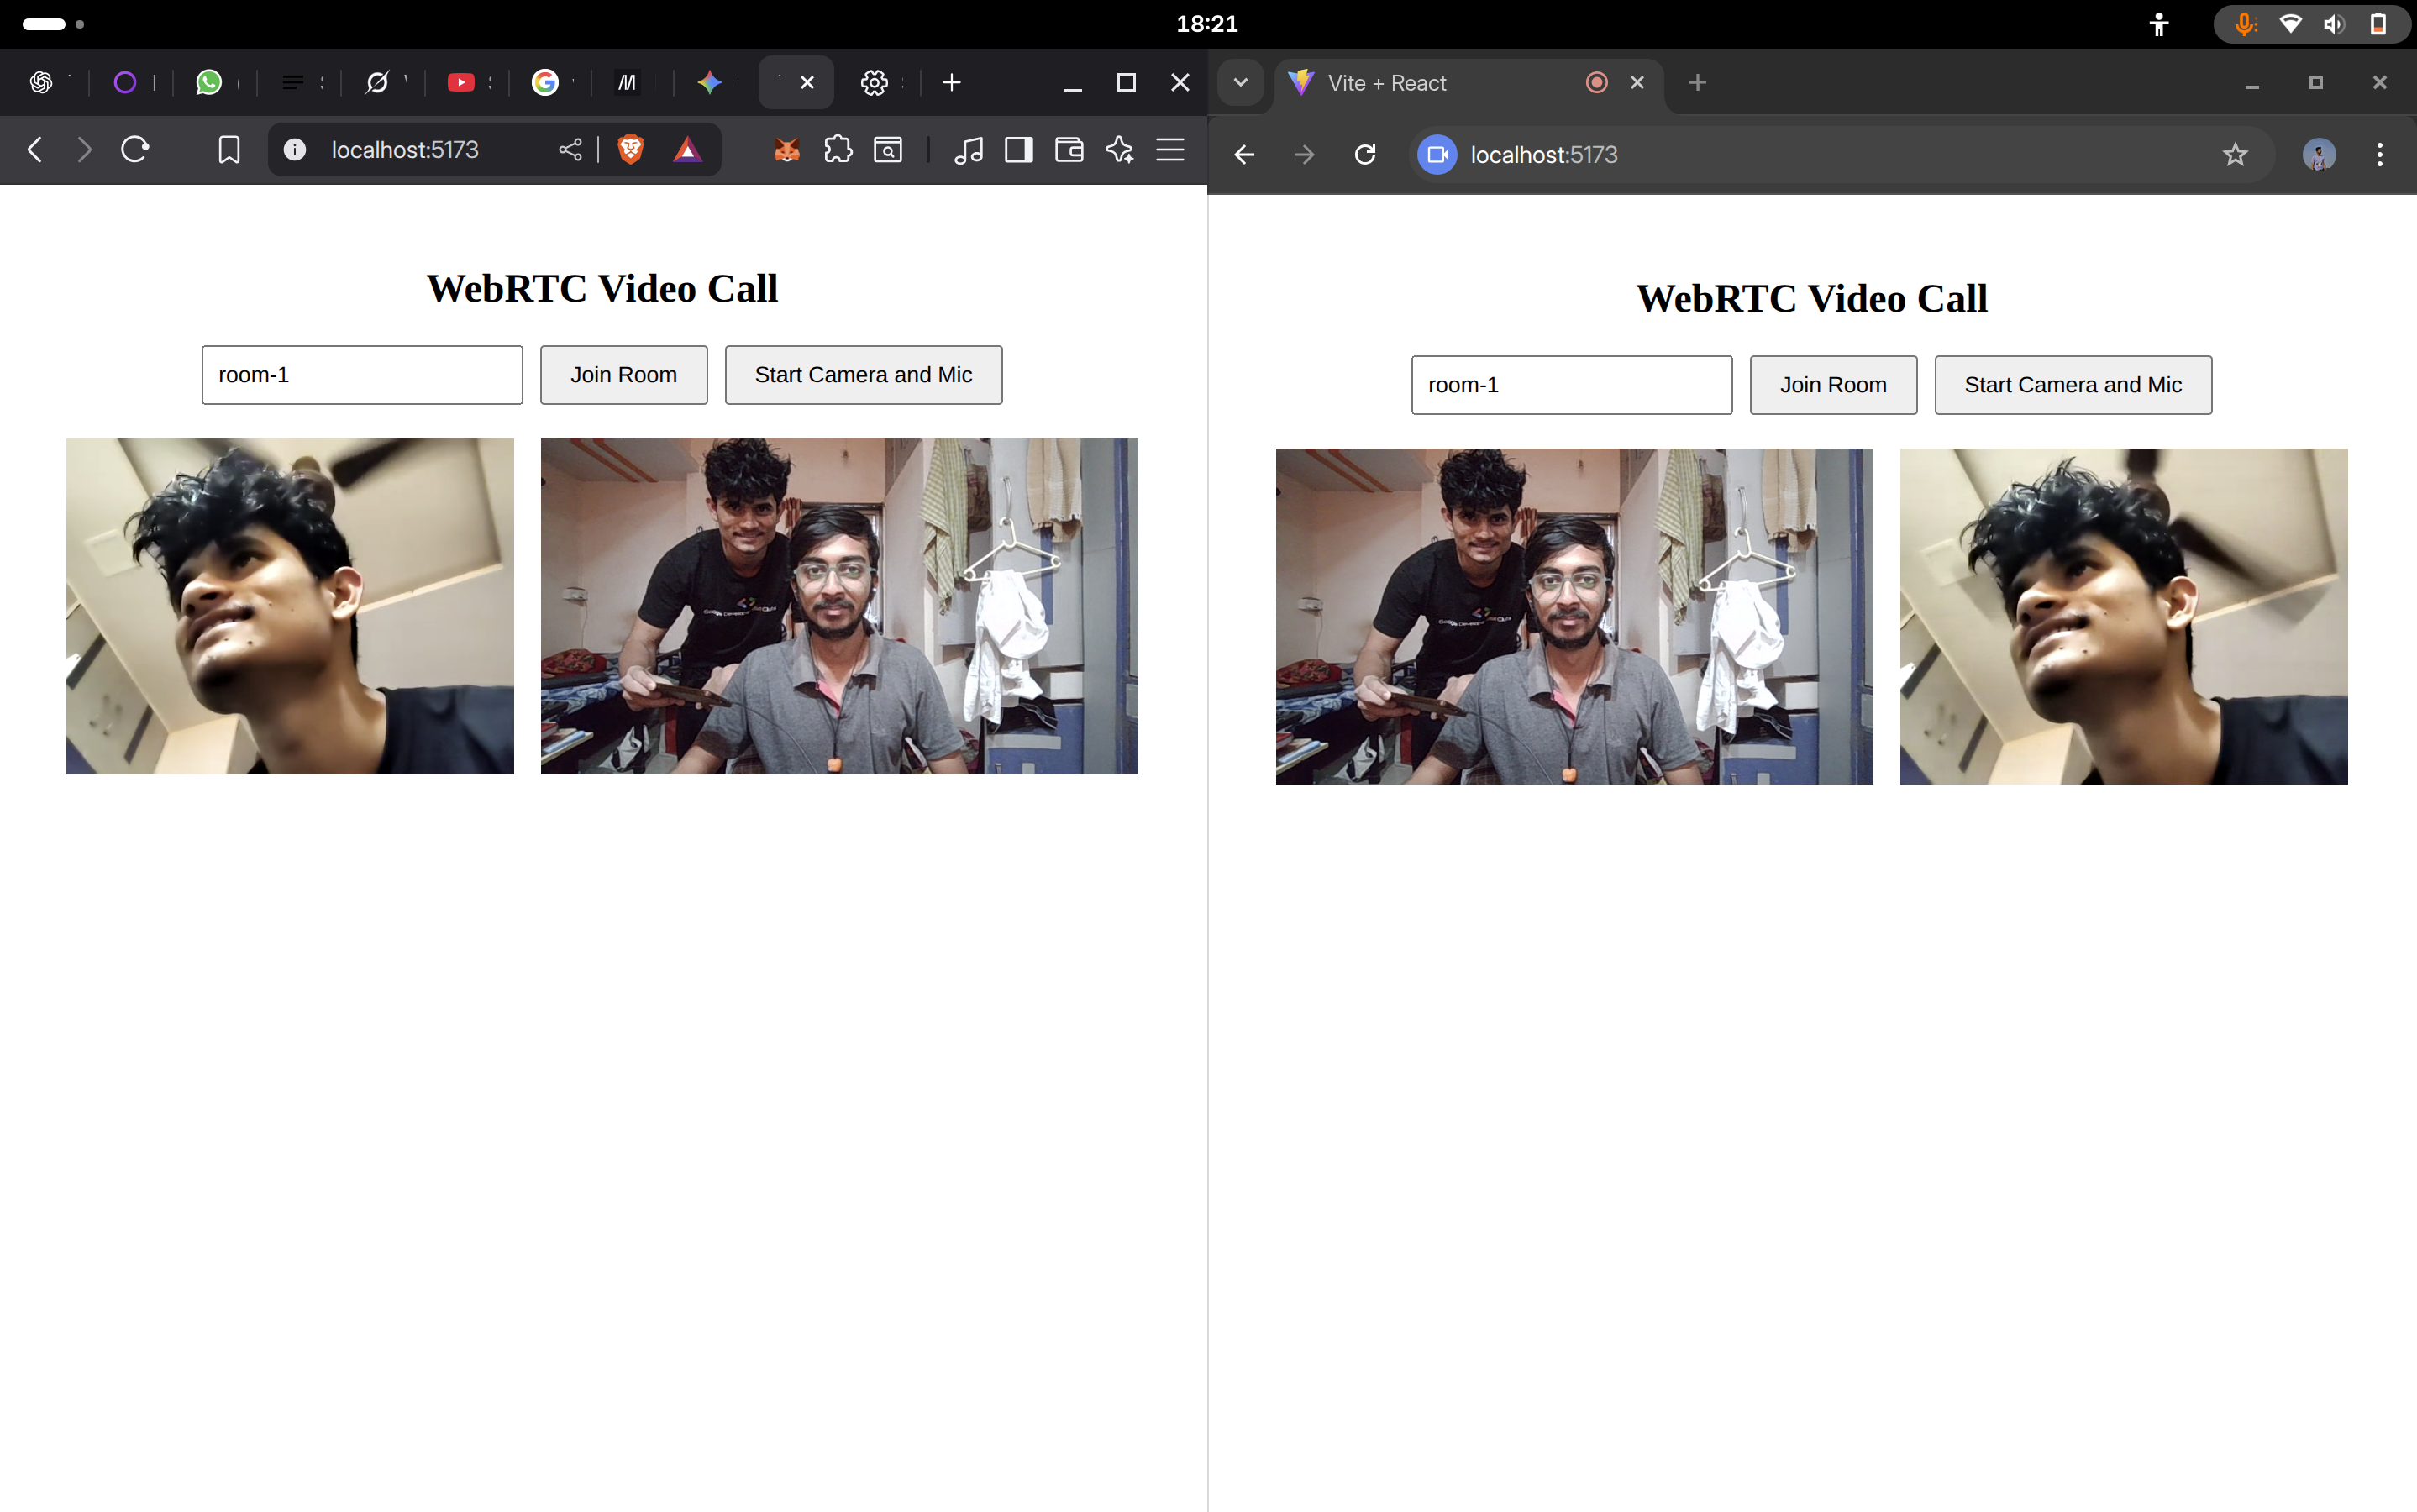
This is how the Web App looks like:
!